Laboratory #1: Microscope use
I. Introduction
II. Laboratory notebook components. Goal: Create your own study tool!
A. Lab handouts and answer sheets. Goal: Answer questions to understand material.
- Be sure to read your lab handout text and view the lab figures! This is a goldmine of information that should be used…
- Answer the questions that are embedded within the lab handouts as you do the lab in the room.
- Lab answer sheet policy: Lab handout answer sheets are to be turned in exactly 1 week after the lab exercise. Late labs will not be accepted (unless there is an excused absence)!
B. Entries. Goal: Organize the information.
- Use a loose-leaf notebook (3-ringed binder)
- Text should be on lined paper
- Number each entry
- Each entry should include:
- Scientific name
- Life cycle stage
- Type of preparation (e.g., whole mount, tissue section, fecal smear, blood smear, spleen smear, etc.)
- Size: in micrometers (µm) or millimeters (mm); whichever is most appropriate; be certain to indicate units (if possible)
- Distinctive features; description; in description refer to plates as appropriate. E.g., “looks like cotton candy” (to help you remember)
- Use separate pages for entries for each different lab. On your sheets the entries should be given the same number as listed in the lab handout.
- Only items indicated with an asterisk in the lab handouts need formal drawings (plates); the structures you should label in each drawing are indicated in the lab handouts.
C. Plates. Goal: Drawing as a means of intense observation.
- Use pencil only! Credit will not be given to drawings in pen.
- Use only 1 side of white blank paper. Drawing paper is recommended.
- Label with a ruler.
- Include scientific name and scale bar that indicates size of the specimen. Also include the life cycle stage and type of preparation.
- Specimens should be illustrated with the anterior end up (top of page).
- Once each plate is completed, get it initialed by me. Do not remove your slide from the microscope until after I have initialed the drawing.
III. Laboratory notebook grading format:
- Notebook grades will be assigned for each of the 3 lab notebook components
- Plates: 15 points (general appearance, accuracy including use of stipples, labels, and legends). 30 total points.
- Entries: 10 points (general completeness; format). 20 total points
- Laboratory handouts: 5 points each lab (accuracy). 60 total points. This will be based on answers to question, and completion of any added activities, such as dissections.
- Compound microscope use:
A. Use of the ocular micrometer: The first five or six labs involve studying some very tiny parasitic “protistans”. Determining the size of these organisms requires us to calibrate our microscopes with a microscopic ruler, known as an ocular micrometer. It is a tiny white ruler on a glass slide in which subdivisions within millimeters are shown as micrometers. There are 1000 micrometers in a millimeter.
We can use an ocular micrometer on the slide to figure out what the total length is of a second ruler that is positioned within the ocular lens of the microscope. This second ruler is called a reticle, or ocular ruler. It is a black ruler. You should be able to see it when you look in the microscope. It has a total of 10 large subdivisions and 100 small subdivisions.
You will be able to compare the size of a specimen you view in the microscope with the ocular ruler. However, the length between subdivisions on the ocular ruler depends on the degree of magnification. This will make more sense once you view the ocular micrometer at different magnifications.
Before calibrating your microscope, think about the diameter of your field of view:
Which of the objectives provides the broadest (largest) field of view?_____________
Now, calibrate your ocular ruler at each of the four magnifications on your compound microscope. Do this by placing the glass slide with the ocular micrometer on the stage, centering, and focusing. You should be able to see the ruler and finely focus on the line with its subdivisions. With the ocular micrometer in focus, use it to determine the total length of your ocular ruler, as well as the distance between each large subdivision and the distance between each small subdivision. Begin with the 10x objective (100x total magnification) and then do the other magnifications. Complete the following information in the table, labeling your measurements (e.g., micrometers):
(After your lab has been graded, cut out this portion of the page and tape it somewhere prominent on your lab notebook so that you can refer to it the rest of the semester!

|
Total magnification |
Ocular ruler/reticle– total length |
Ocular micrometer– Distance between Large subdivisions |
Ocular micrometer– Distance between Small subdivisions |
|
40x |
|
|
|
|
100x |
|
|
|
|
400x |
|
|
|
|
*1000x |
|
|
|
*Note: This is the objective lens that you will use with oil. It is called oil immersion. If you have not done this before, ask for my help.
1. Whole mount of a thorny-headed worm (Phylum Acanthocephala, Leptorhynchoides theacutus or similar). Slide box slide 1. These specimens were collected from the intestine of a local gamefish species (e.g., Largemouth bass, bluegill) at the SUNY Biological Field Station in Cooperstown. These slides were actually prepared by SUNY Oneonta students conducting research! This is the adult stage of a parasitic worm species that utilizes a small crustacean as its first (intermediate) host and a fish as its final (definitive host) in its life cycle.
Examine the specimen with your microscope and complete the entry for it on a separate piece of paper (for proper entry format, see “II. B.” on page one).
Now, using either 40x or 100x magnification to view the worm, measure its total length:_________________________. You can check your answer by taking the slide off the microscope and measuring the worm with a millimeter ruler—the answers should be similar! Using 400x magnification, measure the length of one of its hooks as accurately as possible:______________________
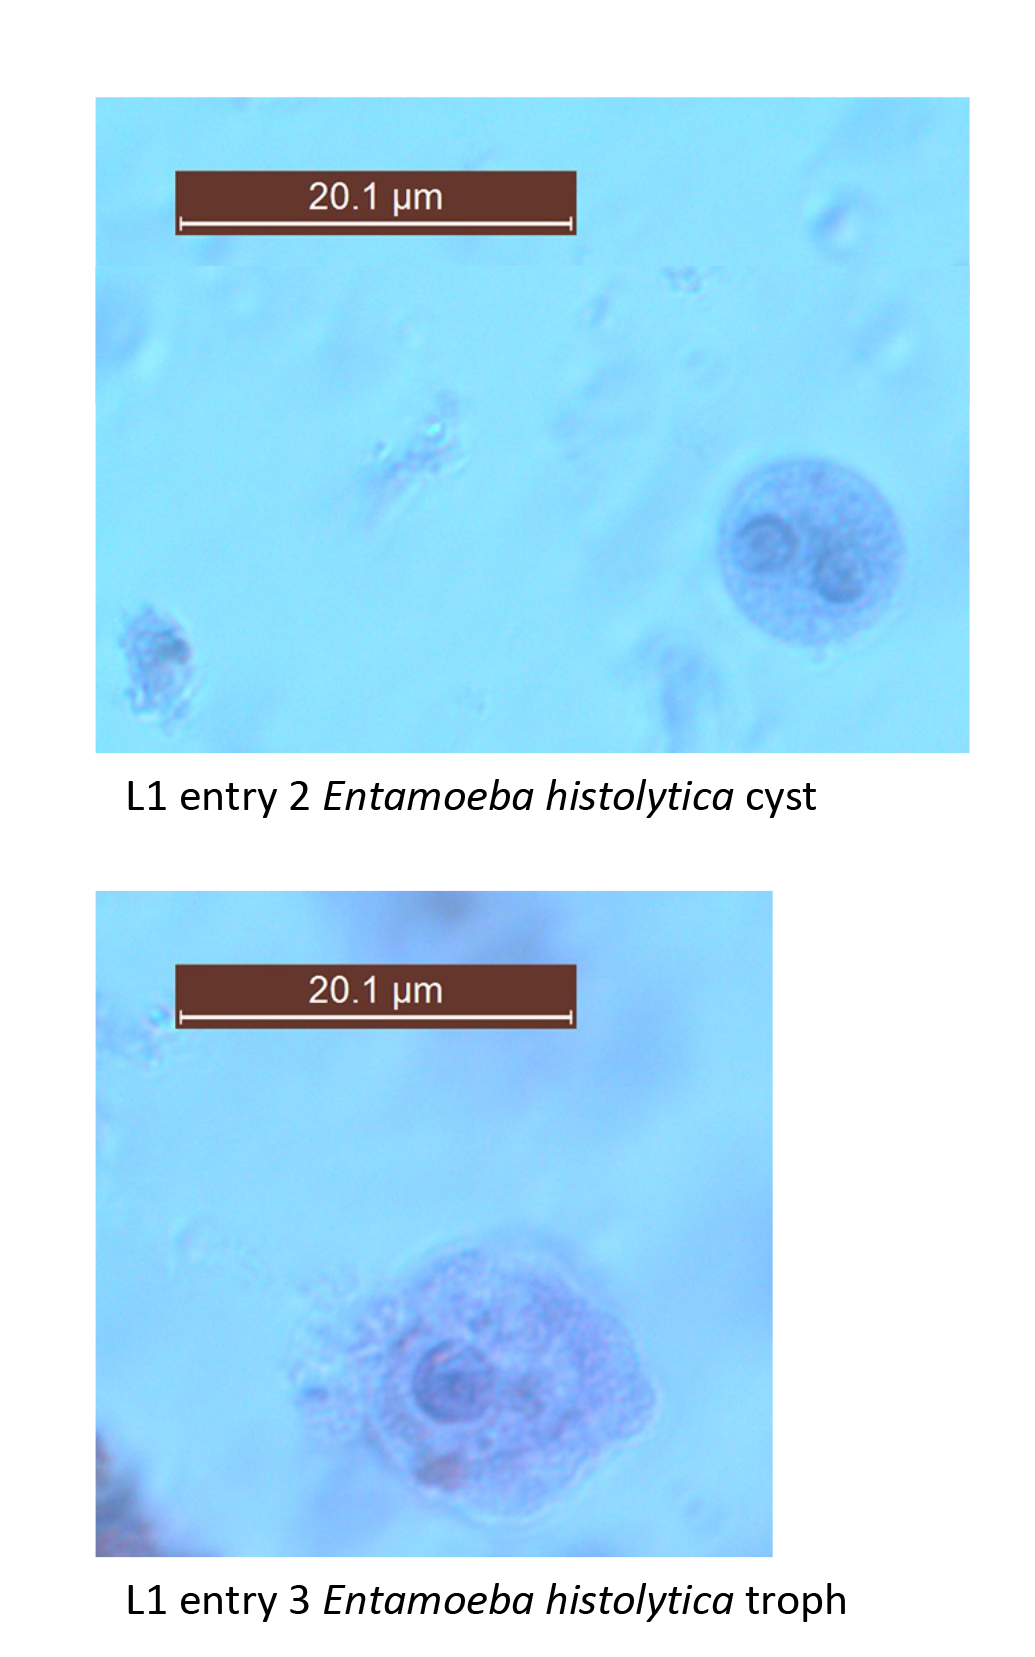
*2. Entamoeba histolytica– cyst. Fecal smear. Plate. Slide box slide 2 (See figure and textbook pg. 106 Figs. 7.1 & 7.2). This is a species of parasitic ameba (Phylum Archamoebae) that is found in the digestive tract of humans and other animals. Protozoans of the digestive tract usually exhibit two forms, an active feeding dividing form called the trophozoite, which perishes rapidly outside the host, and a non-feeding excysted form, better suited for survival in the external environment. This stage is usually called the cyst. We will examine more parasitic amebas next week.
The purpose of examining this specimen today is to become familiar with searching for tiny specimens with the 100x (oil immersion objective), and to become familiar with drawing a plate.
Begin by focusing on your slide at 100x magnification. You must focus clearly on the field of fecal debris before you can increase magnification. Once focused, go up to 400x and begin to search for tiny sphere-shaped entities that might be cysts. It will be hard at first to distinguish the cysts from all the other objects you view! This will improve with practice. Once you have found what you believe is a cyst, center it and continue to 1000x (oil immersion) magnification, carefully adding a drop of oil onto the slide when the microscope nosepiece is rotated so that the slide is halfway between the 40x and 100x objective.
Once you have found a specimen that you would like to draw, have me or the “TA” verify it. Then proceed to make a plate on a separate sheet of paper (see guidelines above under “II. B.” on page 1). Label the following structures: cell membrane, cytoplasm, nucleus, and endosome and chromatoid bars that are smooth. Be sure your plate drawing is complete. In addition to the drawing itself, it should consist of labels, label lines, a scale bar with label to show specimen size, magnification, and a title. I will initial the plate drawing before you remove the slide of Entamoeba coli from your microscope.
The diagnostic stage of E. histolytica is the ____________________________ .
*3. Entamoeba histolytica. Trophozoite. Fecal smear. Plate. Slide box slide 3. (See figure and textbook pg. 106 Fig. 7.1) Trophozoites of this species can invade mucosal tissue and cause the characteristic flask-shaped ulcers in the wall of the large intestine (see #3 below). Red blood cells can often be observed inside the food vacuoles. Note the following structures: nucleus, nuclear membrane chromatin, endosome, food vacuole, cell membrane, and pseudopod. Note the central endosome within the nucleus and the relatively even arrangement of the nuclear membrane chromatin. These features help distinguish this potentially pathogenic species from the commensalistic Entamoeba coli.
Provide an example of a site other than the large intestine where you might find trophozoites of E. histolytica: ___________________________